Introduction
Sourcing and designing vanilla orchid grow lights is not a high-output problem. Vanilla is a shade-adapted climbing orchid, not a high-wire fruiting crop, and that single fact reshapes how you design supplemental lighting for it. Where a tomato house chases 20+ mol·m⁻²·d⁻¹, vanilla production in a greenhouse sits in a much narrower band. Practical targets for vegetative growth land between 6 and 10 mol·m⁻²·d⁻¹, delivered at 80–150 μmol·m⁻²·s⁻¹ over a long photoperiod, and pushing past that band buys you scorched leaves, not pods.
Delivering that band reliably is harder than choosing a fixture. Supplemental lighting for vanilla orchids sits at the intersection of three constraints: a stable yield and quality target, an energy bill that also carries heat load and humidity control, and a safety file that has to survive inspection. Get the controller logic wrong, and you overshoot DLI on bright days, waste power, and stress the canopy. Get the documentation wrong and the project stalls in procurement.
What follows is a working design set: crop light targets, spectrum and uniformity criteria, DLI-based control logic with sensor placement, fixture and compliance evaluation, and a commissioning sequence that verifies the installation before the first harvest cycle depends on it.
Crop Light Targets
Physiology and Shade Tolerance
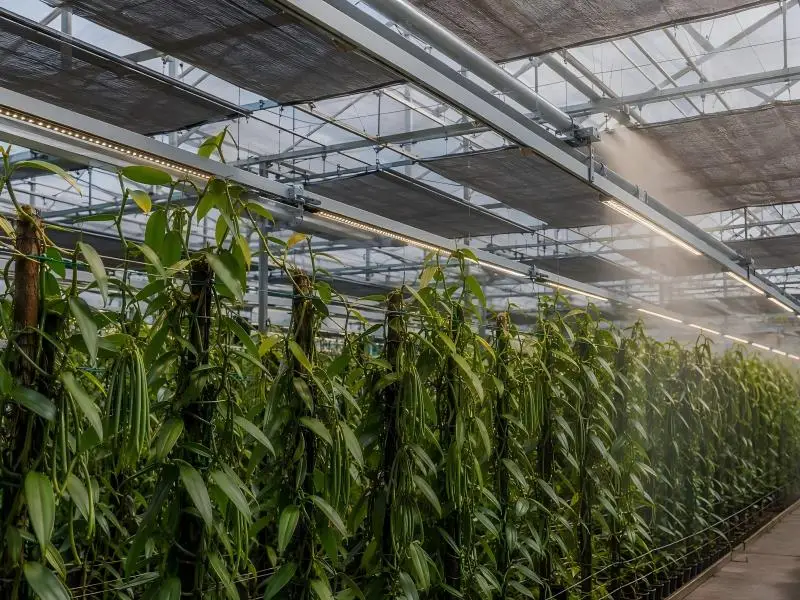
Vanilla planifolia evolved in the tropical understory, climbing tree trunks under a canopy that filters most incoming radiation. Its leaves are adapted to that reality: they are sensitive to sustained high irradiance and show chronic photoinhibition when light is excessive. Under field conditions, growers report best development at roughly 35–50% shade, with several sources converging near 50% and some recommending 50–70% during intense sun or dry periods.
The quantitative picture matches the horticultural one. A 2026 dose-response study on Vanilla planifolia found that vegetative growth saturates at a PPFD of about 125 μmol·m⁻²·s⁻¹ under a 12-hour photoperiod, and documented strong inhibition at 67% relative illumination, equivalent to roughly 1,285 μmol·m⁻²·s⁻¹. In other words, the crop’s productive ceiling is far below what a modern fixture can physically deliver. The design problem is not producing enough photons; it is preventing too many of them from arriving at the wrong time of day.
That asymmetry drives every other decision in this article. A vanilla house needs a lighting system with genuine low-end resolution, with smooth dimming down to a small fraction of rated output, plus shades that can close in the middle of the day when outdoor DLI is already satisfied.
PPFD and DLI bands
Two numbers govern crop dose. PPFD (photosynthetic photon flux density) is the instantaneous intensity at the canopy, in μmol·m⁻²·s⁻¹. DLI (daily light integral) is the total accumulated photosynthetic light over 24 hours, in mol·m⁻²·d⁻¹. Extension guidance from MSU Extension’s definition of daily light integral puts the common greenhouse target minimum at 10–12 mol·m⁻²·d⁻¹ for floriculture crops, with Moe’s widely used categories placing low-light crops at 5–10, medium-light crops at 10–20, and high-light crops at 20–30 mol·m⁻²·d⁻¹.
For comparison, Ohio State’s strawberry lighting targets set a 10–12 minimum and a 20–25 optimum for a high-light vine. Vanilla orchid PPFD and DLI targets sit well below both benchmarks.
Vanilla belongs in the low-light category, but not at the bottom of it. That low ceiling is why vanilla orchid DLI targets matter more than peak intensity: a defensible commercial band looks like this:
| Growth stage | DLI target (mol·m⁻²·d⁻¹) | Supplemental PPFD (μmol·m⁻²·s⁻¹) | Notes |
|---|---|---|---|
| Young vines, establishment | 6–8 | 80–110 | Build slowly; avoid sudden intensity jumps after transplant |
| Active vegetative growth | 8–10 | 110–150 | Peak band for vine extension and leaf area |
| Reproductive, pod set and fill | 7–9 | 90–130 | Slightly lower than peak vegetative; protect leaves |
| Post-harvest recovery | 5–7 | 70–100 | Reduce load; watch canopy temperature |
Treat the band as a target window, not a setpoint to chase precisely. Vanilla tolerates a modest daily deviation far better than a hard swing. What it does not tolerate is a house where the canopy sees 400 μmol·m⁻²·s⁻¹ on a clear afternoon because the shade system and the lights are not coordinated.
One more variable sits between outdoor light and delivered DLI: glazing. Transmission losses, diffuse coatings, and accumulated dirt change the usable photons reaching the canopy, and greenhouse glazing and light transmission should be re-characterized before you size a supplemental system against nameplate assumptions.
Photoperiod Choices
Vanilla is a CAM plant, which means gas exchange and carbon fixation are shifted toward the night. That does not make it a short-day crop for lighting purposes, but it does mean you should avoid stacking a long photoperiod on top of high intensity. The practical pattern in greenhouses is a long, gentle day: 14 to 16 hours of supplemental light at modest PPFD rather than 12 hours at high intensity.
The arithmetic supports that choice. Because DLI is intensity multiplied by time, a longer window lets you reach the same integral with lower instantaneous PPFD, which keeps the canopy below the photoinhibition threshold that the 2026 study identified.
| Photoperiod | PPFD needed for 8 mol·m⁻²·d⁻¹ | PPFD needed for 10 mol·m⁻²·d⁻¹ |
|---|---|---|
| 12 h | 185 | 231 |
| 14 h | 159 | 198 |
| 16 h | 139 | 174 |
| 18 h | 123 | 154 |
Notice that a 12-hour schedule forces you above 180 μmol·m⁻²·s⁻¹ to hit even the mid-band target, which creeps toward the intensity range where vanilla shows stress. Extending to 16 hours brings the required intensity back under 150 μmol·m⁻²·s⁻¹. Choose the longer day, and treat anything above 150 μmol·m⁻²·s⁻¹ as a signal to re-check the schedule rather than a reason to add power.
Spectrum and Uniformity
Balanced Spectrum for Vanilla
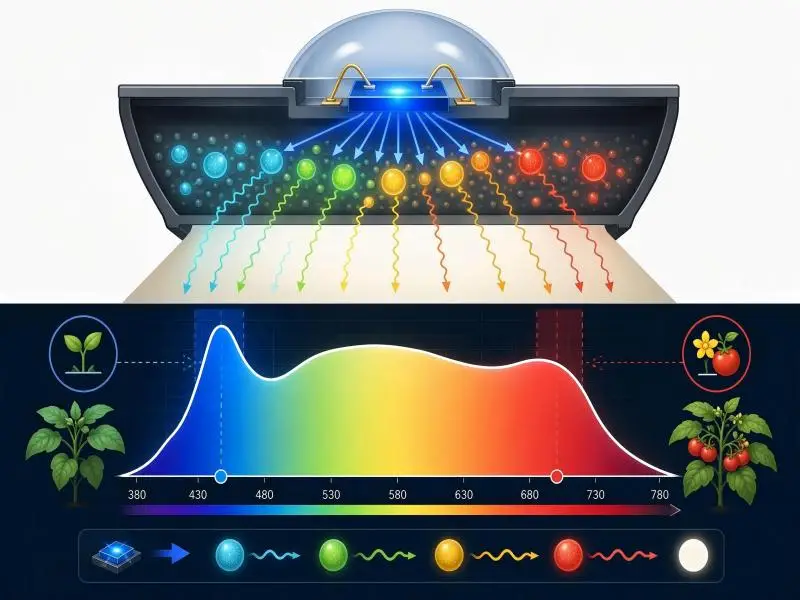
Spectrum for a shade-adapted vine is a fine-tuning knob, not the engine. Intensity and daily dose do the heavy lifting; spectrum decides morphology, and for vanilla the goal is compact, well-leafed vines rather than stretched ones.
That pushes you toward a balanced broad-spectrum recipe rather than a far-red-heavy “stretch” mix. Sunlight carries a red-to-far-red ratio of about 1.2–1.3, and that ratio collapses to 0.3–0.4 under canopy cover and as low as 0.1 in deep shade. A low R: FR ratio signals competition to plants and triggers shade-avoidance morphology: longer internodes, thinner and larger leaves, and reduced leaf mass per unit area.
MSU Extension’s analysis of far-red radiation explains how that filtering response works, and why heavy far-red produces elongation even in crops that would otherwise stay compact.
Green light is worth keeping in the mix for a different reason. It drives photosynthesis less efficiently than red per unit of leaf area, but it penetrates deeper into the canopy and into lower leaf layers where red and blue have already been absorbed, contributing to whole-canopy carbon gain. A 2017 review in the Journal of Experimental Botany, Don’t ignore the green light, documents that contribution. For a vine crop with substantial vertical structure, that penetration matters more than it would for a flat canopy.
A practical recipe for vanilla: red-dominant with a meaningful blue fraction for compact growth, a moderate green fraction for canopy penetration, and a restrained far-red fraction: enough to support photosynthesis, not enough to signal deep shade. Verify what you actually get with a spectroradiometer or a manufacturer-provided spectral power distribution rather than trusting a marketing chart.
Canopy-Level Uniformity
Uniformity determines whether your target DLI describes the whole space or just the best-lit square meter inside it. If the average PPFD is 120 μmol·m⁻²·s⁻¹ but the corners see 70, the crop will grade out accordingly, and no amount of controller tuning fixes a layout problem.
The standard commercial metric is minimum-to-average PPFD, written as U₀: the lowest reading on the measurement plane divided by the average. IES guidance on horticultural lighting uniformity notes that a 10–20% variation in intensity is generally treated as acceptable, while tighter targets around 5% are used in research settings.
For commercial vanilla production, set an acceptance threshold before you buy: U₀ of at least 0.80 across the canopy plane, with a coefficient of variation at or below 15%. Anything below 0.70 minimum-to-average is a layout problem, not a dimming problem.
Four levers move uniformity, in rough order of cost:
- Fixture spacing and mounting height, usually the cheapest correction.
- Optics and beam distribution, which is the right choice at design time and expensive to change later.
- Edge compensation, running boundary zones at higher output to offset perimeter loss.
- Zoning, splitting the house into independently dimmable areas so weak zones can be corrected without over-lighting the rest.
Zoning interacts directly with crop safety. A vanilla house with a shaded walkway, a bright ridge, and an exposed south wall has at least three different light environments. PPFD uniformity acceptance covers the measurement workflow and the metrics to agree on with your supplier before fixtures ship.
Sensor Placement Basics
A uniformity study is only as good as where you point the sensor. Measure at canopy level, not at the fixture, with a calibrated quantum sensor covering the 400–700 nm PAR range and cosine-corrected for angled light. The Resource Innovation Institute lighting best-practices guide frames PPFD and DLI logging as an ongoing operating practice rather than a one-time acceptance test, which is the right mental model.
Three placement rules do most of the work. First, fix a repeatable measurement plane (typically the top of a mature canopy at a defined distance below the fixtures) and use it for every audit. Second, build a grid across the house rather than sampling convenient spots, and sample more densely at edges, corners, aisle sides, and underneath structural members where losses concentrate. Third, take the reading under real operating conditions: same mounting height, same dimming level, same shade position, same canopy stage.
For control sensors, keep the distinction clean. The sensor that drives the controller should sit in a representative zone, not in the best-lit or worst-lit corner, and it should be shielded from direct fixture output so it reads canopy light rather than fixture output. Log the reference measurements separately from the control signal; mixing the two makes every later diagnosis ambiguous.
DLI-Based Control and Sensors
Setpoints and DLI Formula
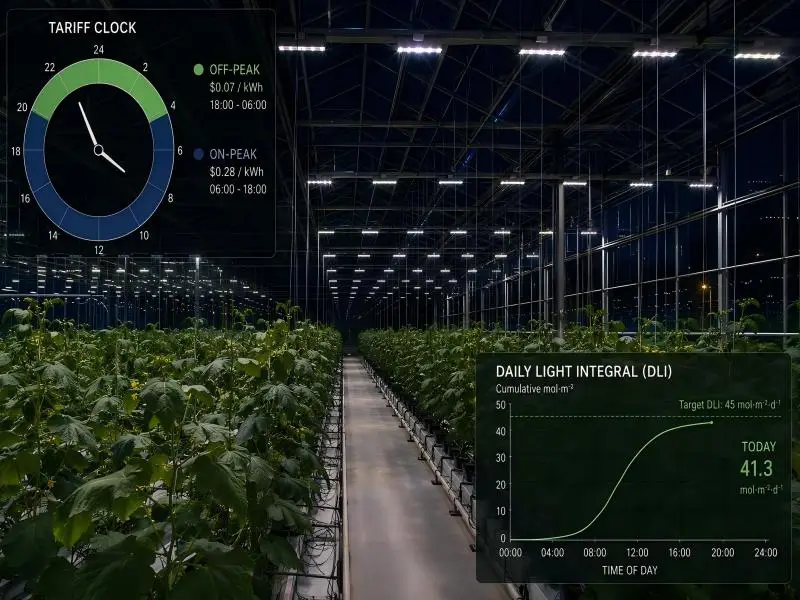
Everything in the control system reduces to one equation. DLI equals PPFD multiplied by photoperiod in hours, multiplied by 0.0036. Written out in full, DLI (mol·m⁻²·d⁻¹) = PPFD (μmol·m⁻²·s⁻¹) × hours × 3,600 ÷ 1,000,000. Read the integral, decide how much of it natural light will supply, and the supplemental requirement falls out as the deficit.
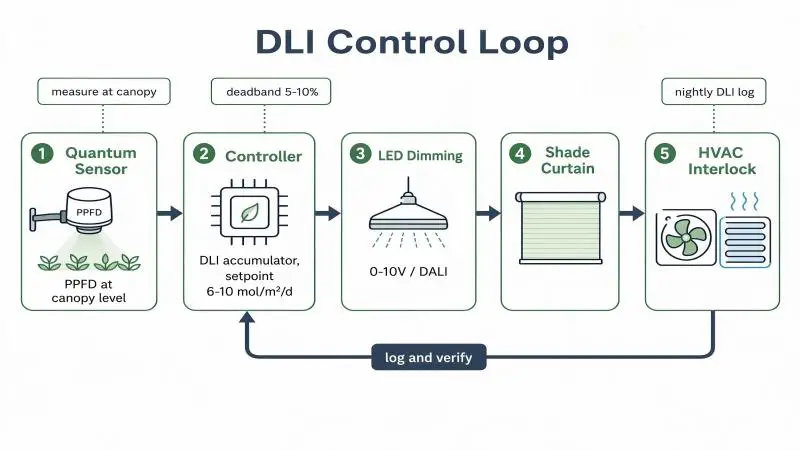
The control chain has five elements. Quantum sensors measure canopy PPFD continuously, and the controller accumulates the running integral through the day. The controller compares that accumulated total against the day’s setpoint, for vanilla typically 8 mol·m⁻²·d⁻¹ during active vegetative growth, and allocates the remaining deficit to the light window.
LED dimming runs on an analog or digital protocol, 0- 10 V or DALI in most commercial installations, with output resolved finely enough to run at 20–30% without flicker or step artifacts. The shade curtain provides the negative control, closing when outdoor DLI is already sufficient and reopening as the deficit returns. The HVAC interlock keeps the lighting decision physically honest: if the lights are pushing canopy temperature or VPD out of range, the interlock must be able to override the light schedule.
Greenhouse supplemental lighting calculation walks through the full sizing workflow from latitude-driven outdoor DLI through glazing transmission and crop target, which is the sequence to follow when the deficit has to be sized rather than tuned.
The equation also tells you why the sensor placement matters so much. A control sensor that reads 10% high will systematically under-deliver the crop’s integral, and the grower will see the shortfall as slow vine extension rather than as a sensor fault. Calibration schedules belong in the operating procedure, not in a binder.
Dynamic Dimming with Shading
Static schedules waste light and burn energy. The better pattern is deficit tracking: fixtures dim or switch off on bright days and run longer or stronger on dark days to reach the same daily total. Extension framing of supplemental-light economics supports exactly that approach: the value of the light is in the delivered photons, not in the hours the fixtures were on.
Two rules keep dynamic control stable. First, define a lighting window with a hard end time, and if the deficit has not been closed by then, accept the shortfall rather than extending into the dark period. Vanilla’s CAM metabolism is a reason to protect the night, and a controller that quietly stretches the photoperiod to “hit the number” will create metabolic problems that look like a nutrient or irrigation issue. Second, give the shade system priority over the supplemental schedule. If natural light is already sufficient, supplemental light is redundant regardless of where the integral stands.
Keep an eye on the interaction between dimming and uniformity. Dimming a whole zone uniformly preserves the ratio between zones; dimming one zone while leaving its neighbours at full output changes the canopy’s light environment. Zoning should reflect the physical layout of the house, not the convenience of the electrical panel.
Verification and Logging
Control without logging is guesswork with a display attached. Log at minimum the canopy PPFD signal, the accumulated DLI, the fixture dimming level, the shade position, and the lighting window start and stop times, at a resolution fine enough to see a half-hour shading event.
Nightly DLI totals build the record that matters most. Compare the logged integral against the target band over a rolling week, and investigate any day that lands outside it. Persistent shortfalls point to undersized fixtures, dirty glazing, or a sensor reading low. Persistent overshoots usually mean the shade system is responding too slowly or the setpoint deadband is too tight.
Purdue Extension’s greenhouse DLI measurement guide covers the measurement practice behind those logs, including how greenhouse materials and shading strategies change usable light at the canopy. The measurement principles there apply directly to a continuous control installation, even though the document is written for periodic auditing.
Two diagnostics are worth building into the routine. A sensor cross-check, comparing the control sensor against a handheld reference meter at the same spot under the same conditions, catches drift before it becomes a crop problem. A shade-lag check, watching how long the curtain takes to reach position after a command, catches mechanical wear that would otherwise show up as unexplained DLI variance.
Fixtures, ROI, and Compliance
Selecting Vanilla Orchid Grow Lights
Vanilla’s low target intensity creates a fixture-selection problem that is the opposite of a high-wire vegetable house. You are not maximizing photons per fixture; you are looking for a luminaire that stays efficient, uniform, and stable at 20–40% output, then can be scaled if the operation expands or the crop mix shifts. Greenhouse LED grow lights for this duty cycle need genuine low-end dimming resolution, not just a dimmer input on the data sheet.
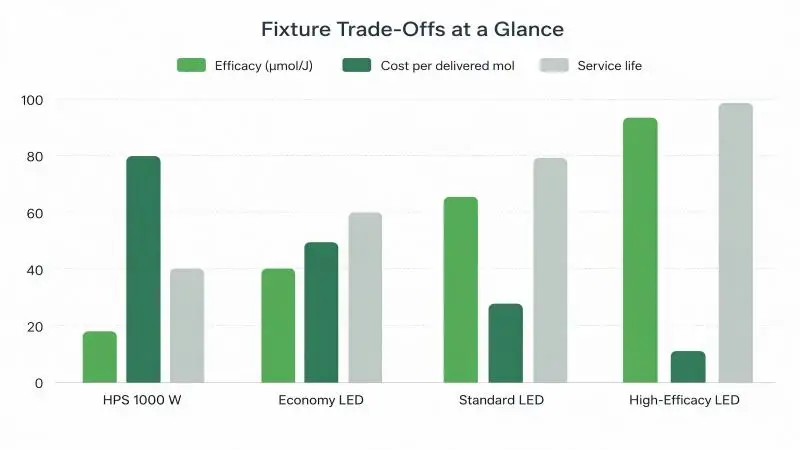
The chart above uses illustrative index values to show the shape of the trade-off rather than measured products. Efficacy climbs sharply from legacy HPS to high-efficacy LED, while cost per delivered mole falls; service life improves as driver quality and thermal design improve. The point of the comparison is not that one column wins outright. It is that a fixture purchase decision made on efficacy alone will miss two of the three variables that determine actual cost.
Evaluate candidates against four criteria:
| Criterion | What to ask for | Why it matters for vanilla |
|---|---|---|
| Efficacy (μmol/J) | Third-party or LM-79 test data for the exact model | Determines energy cost per delivered photon at low dimming levels |
| Low-end dimming behavior | Dimming curve, minimum stable output, flicker data | Vanilla runs at low output; a fixture that steps coarsely at 20% will overshoot the band |
| Uniformity at your mounting height | Photometric IES/LDT file plus simulated PPFD map for your layout | Predicts U₀ before purchase instead of after commissioning |
| Service life and warranty | L90 or equivalent lumen maintenance, driver replacement terms | Downtime in a production house is a crop risk, not just a repair cost |
Cost per delivered mole is the metric that ties those criteria together. It divides total fixture, installation, electricity, maintenance, and climate cost by the usable photons delivered to the canopy over service life. MSU Extension’s investment considerations for greenhouse lighting treat efficacy as the dominant operating-cost lever, and Purdue Extension’s method for valuing supplemental light frames the decision in terms of the delivered photons a grower is actually buying. Run the comparison on delivered moles, not on fixture price or wattage.
Modern commercial LED fixtures generally sit in the 2.5–3.5 μmol/J band, with higher-efficacy options above that. For a vanilla house running a long, gentle photoperiod at partial output, the practical question is not the peak number on the data sheet but how that number holds up at the dimming level you will actually use.
For operations standardizing across multiple sites, SLTMAKS ships ETL-, CE-, and RoHS-certified luminaires with DLC-listed options, publishes IES/LDT photometric files that can be imported directly into a layout simulation, and backs the fixtures with a three-year warranty. That combination of certification, photometric transparency, and documented warranty terms is what a procurement team needs in order to compare bids on equal footing rather than on brochure numbers.
Efficacy, Heat, and HVAC Interplay
Lighting decisions are HVAC decisions. LEDs convert a larger share of input energy into photons and radiate less heat toward the canopy than HPS, which reduces cooling load but can increase heating demand in cold periods. In a cooling-limited greenhouse, that shift improves the economics of supplemental lighting. In a heating-limited house, it can erode them, and the penalty shows up in the gas bill rather than the electricity bill.
That asymmetry is why a lighting ROI model built on electricity alone is unreliable. Build the model around lighting energy plus the change in heating and cooling load, then test it against the seasons that actually constrain the facility. A vanilla house in a hot climate is usually cooling-limited, which favours a high-efficacy fixture that puts fewer watts of heat into the canopy zone. A house in a cold climate has a more complicated calculation, because the heat that the old HPS fixtures contributed for free was doing work you now have to pay for.
Canopy temperature belongs in the operating logic, not just the financial model. Vanilla is sensitive to sustained heat at the leaf surface, and the combination of high PPFD and poor airflow is the fastest way to produce scorched margins. The HVAC interlock in the control chain exists for this reason: when canopy temperature or VPD leaves its band, lighting output should yield.
Certifications and Safety
Certification is where a lighting project either clears inspection or stalls. Four items matter for a commercial greenhouse installation.
ANSI/CAN/UL 8800 is the North American safety standard written specifically for horticultural lighting equipment, covering the electrical, mechanical, and environmental conditions that general luminaire standards do not address. UL 8800, the horticultural lighting safety standard, is the standard an inspector or an authority having jurisdiction will expect the fixture to be listed to, and it should be listed for the exact model, not for a product family. An ETL or equivalent NRTL mark is the third-party listing that demonstrates the testing; the mark itself is not the standard, so check what standard the listing covers.
In humid, condensing, washdown-prone greenhouse environments, ingress protection matters as much as electrical safety. Look for an IP rating appropriate to the installation zone, plus a listing that covers the actual mounting location. Photobiological safety falls under IEC 62471, which evaluates eye and skin exposure risk and matters in a house where staff work under the fixtures daily.
DLC horticultural listing serves a different purpose: it is a performance qualification tied to many utility rebate programs, and the DLC horticultural lighting technical requirements set the efficacy and reporting thresholds listings must meet. A DLC listing does not substitute for a safety certification, and a safety certification does not imply DLC qualification. Rebate-dependent projects need both, and confirming eligibility before purchase is far cheaper than confirming it after installation.
UL 8800 and certification documentation explain how to read a certification package and what to request from a supplier when the local authority asks for evidence.
Commissioning and Operations
Pre-Commission Checklist
Commissioning starts before fixtures arrive. The work below prevents the two most common failure patterns: a layout that cannot meet its uniformity target, and a control system that cannot hold its DLI band.
- Canopy reference plane defined and marked at a fixed distance below the fixture plane
- Photometric IES/LDT files received for the exact fixture model and imported into the layout simulation
- Simulated PPFD map reviewed for U₀ and for edge and corner performance at the planned mounting height
- Quantum sensor calibration certificates on file, with a calibration interval set
- Dimming protocol confirmed (0-10 V or DALI), with the minimum stable output verified on a sample fixture
- Shade curtain travel time measured and recorded, including the lag between command and full position
- HVAC interlock logic documented, including the canopy temperature and VPD thresholds that will override lighting
- DLI setpoints agreed by growth stage and entered as a seasonal schedule rather than a single fixed value
- Certification and test documentation collected for the exact models being installed
Initial Tuning and Deadbands
Tune in daylight conditions, not at night with the house sealed. Start with the shade system and work inward: confirm the curtain closes when outdoor light alone would exceed the day’s target, and confirm it reopens smoothly rather than hunting.
Set the DLI deadband before the first control cycle runs. A band of roughly 5–10% around the setpoint absorbs normal sensor noise and passing clouds without constant dimming changes. Tighter bands produce visible flicker in output and wear the dimming hardware; wider bands let the daily integral drift outside the crop window.
Then tune dimming resolution. Walk the output from minimum to 40% in small increments and watch the PPFD reading at the canopy plane. The response should be smooth and repeatable. If the fixture steps unevenly at the low end, correct the dimming curve or the fixture choice before the crop depends on it. Verify that a commanded reduction at the controller produces the expected change at the canopy rather than at the fixture, since optics and mounting height both sit between the two.
Finally, watch the first full light-day end to end. Log the integral through the day, check where the deficit closes, and confirm the lighting window’s hard end time is respected. A control system that closes the deficit by extending into the night looks fine on an energy report and fails on crop quality.
Maintenance and Seasonal Updates
The system degrades in ways that no single metric captures, so build a routine around the ones that move.
Quarterly, clean glazing and fixtures, verify sensor calibration against a handheld reference, check shade curtain travel time against the commissioning baseline, and review dimming behavior at the low end. Annually, re-run the PPFD grid audit and compare the current map against the commissioning map. A drop in average PPFD points to dirty optics or ageing emitters; a drop in U₀ points to a layout or reflector problem. Both are worth catching before a crop cycle depends on the difference.
Seasonal setpoint updates matter more than most growers expect. Longer summer days mean natural light closes more of the deficit, so the supplemental schedule should shrink; winter days push the deficit up, and the schedule expands. Revisit the DLI setpoint at each season change and at each growth-stage transition, and adjust the shade control thresholds alongside the lighting schedule. Running a July schedule in December is one of the most common causes of unexplained crop variability in greenhouses that have otherwise sound hardware.
Keep the logging record as an operating asset. Two or three years of DLI, dimming, and canopy temperature data will tell you more about your own house than any generic recommendation, including the ones in this article.
Conclusion
Three numbers carry most of the design. Hold DLI between 6 and 10 mol·m⁻²·d⁻¹ for vegetative vanilla, deliver it at 80–150 μmol·m⁻²·s⁻¹, and use a long photoperiod of 14 to 16 hours to reach the integral with gentle intensity rather than with peak output. Supplemental lighting for vanilla orchids succeeds when those three numbers stay within tolerance, and fails in ways that look like nutrition or irrigation problems when they do not.
The action sequence is straightforward once the targets are set:
- Map PPFD across the canopy plane at the intended mounting height, and agree a U₀ acceptance threshold of at least 0.80 with your supplier before purchase.
- Place control sensors in representative zones at canopy level, calibrated and shielded from direct fixture output.
- Integrate the control chain so dimming, shading, and HVAC respond to the same DLI setpoint with a defined deadband and a hard lighting-window end time.
- Verify the installation with nightly DLI logs, a quarterly sensor cross-check, and an annual PPFD grid audit against the commissioning baseline.
Ask your supplier for the photometric files, the certification package, and a layout simulation for your actual house dimensions, then compare bids on cost per delivered mole rather than on fixture wattage. That comparison, run against your own electricity and heat costs, is the one that survives procurement review and the first winter of operation.
Key Takeaway: Vanilla’s light ceiling is low enough that the design challenge is limiting light, not maximizing it. A system that cannot dim cleanly at the low end will fight the crop all season.
FAQ
How much light does a vanilla orchid need in a greenhouse?
Most greenhouse guides put vanilla at 150–250 µmol·m⁻²·s⁻¹ PPFD over a 12–14 hour photoperiod, with leaf scorch reported above roughly 300 µmol·m⁻²·s⁻¹. That converts to a DLI of about 8–12 mol·m⁻²·d⁻¹ — a low-light band far below high-wire fruiting crops. The article’s more conservative targets (6–10 DLI at 80–150 PPFD) sit at the low end of that range, which suits vegetative and post-harvest stages.
Do vanilla orchids need supplemental greenhouse lighting, or is natural light enough?
Only when natural light is insufficient. Vanilla evolved as a shade-adapted understory vine and grows best under bright, filtered light at roughly 35–50% shade, so in a well-lit, high-transmission house, natural light alone can close the daily deficit. Supplemental lighting earns its place in three cases: short winter days, persistent cloud cover, and heavily shaded or dirty glazing. The decision should be driven by a measured deficit (target DLI minus what glazing actually delivers), not by fixture output.
What spectrum and photoperiod should I use for vanilla greenhouse lighting?
Use a balanced broad-spectrum white LED rather than a far-red-heavy “stretch” mix. Sunlight carries a red-to-far-red ratio near 1.2–1.3, and that ratio collapses under canopy cover — heavy far-red signals shade and triggers elongated internodes. For photoperiod, favor a long, gentle day of 14–16 hours at modest PPFD over a short, intense 12-hour schedule, because the longer window reaches the same DLI with lower instantaneous intensity, keeping the canopy below the photoinhibition threshold. Protect the night period, since vanilla’s CAM metabolism shifts gas exchange toward darkness.