Introduction
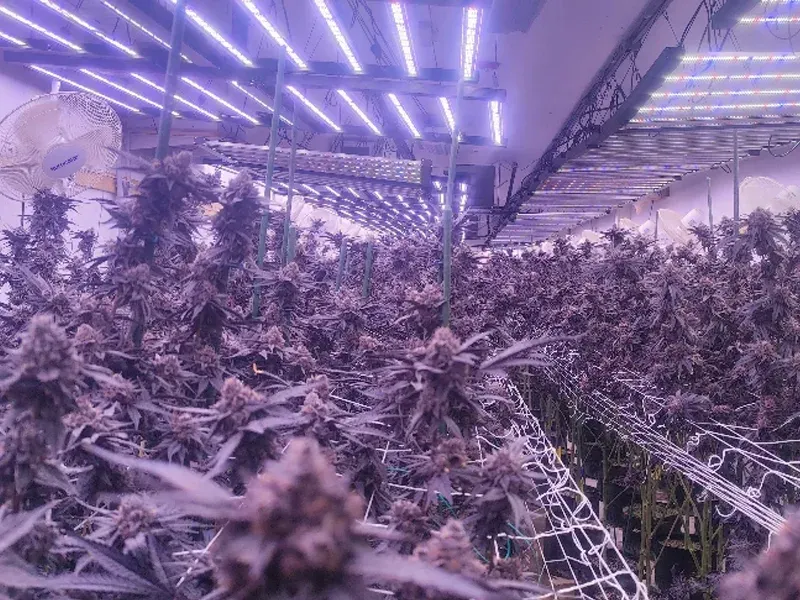
Designing lighting for a 10,000 sq ft cannabis room isn’t about picking a “powerful” fixture—it’s about engineering a repeatable distribution pattern you can commission, document, and scale to the next room.
Here’s what you will design: a scalable, inspection-ready commercial grow light layout that translates a crop target (PPFD/DLI) into a fixture count, spacing plan, electrical loads, and a commissioning process.
Outcome targets should be explicit before you order a single driver:
- PPFD/DLI by stage (veg vs flower) so your lighting schedule is biologically realistic and economically defensible.
- Uniformity at the canopy plane so every bench produces a similar phenotype and harvest window.
- ROI and operating cost with the HVAC and dehumidification penalty included—not just fixture watts.
- Safety and uptime through compliant components, circuit design, and a maintenance plan that avoids surprise downtime.
The method in this guide follows an engineering workflow: photometric modeling → controls integration → commissioning and verification. That workflow is also where brands differ operationally (photometric documentation quality, dimming topology options, build durability in wet rooms, and warranty logistics). SLTMAKS, for example, emphasizes spectrum engineering and commercial documentation (PPFD maps, component choices) alongside practical risk controls like IP-rated builds and a defined warranty—details that become relevant when you’re standardizing across multiple sites.
Table of Contents
Define light targets and map the space (commercial grow light layout inputs)
PPFD and DLI by stage
Start by selecting targets you can defend and verify.
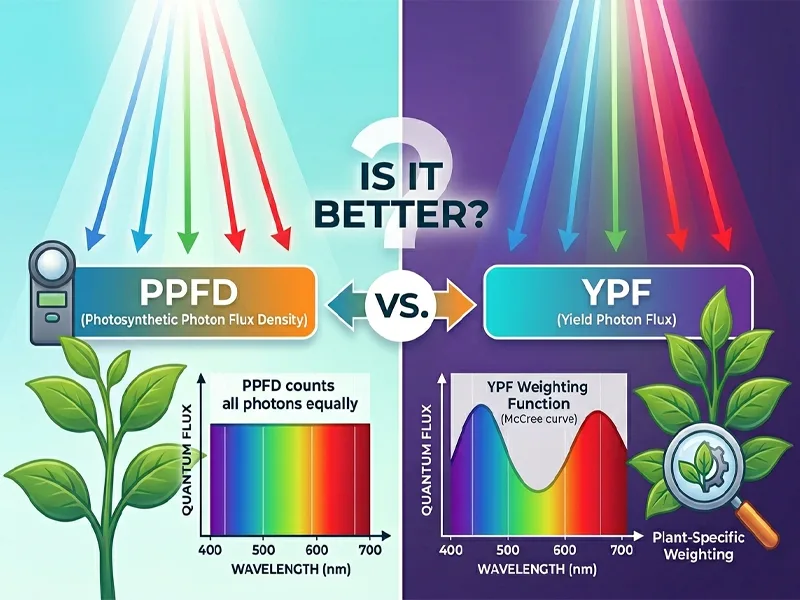
- PPFD (photosynthetic photon flux density) is the instantaneous photon density at the canopy (µmol/m²/s).
- DLI (daily light integral) is the total photons delivered per day (mol/m²/day).
The design implication is simple: PPFD targets are meaningless without photoperiod. A flower room might run 12 hours; a veg room might run 18 hours. You can hit the “same PPFD” and end up with very different DLIs.
Define a target table per room type:
- Veg: target PPFD range + target DLI range
- Flower: target PPFD range + target DLI range
Then define a tolerance band (what you’ll accept at the canopy after commissioning). This is where uniformity metrics become contractual requirements instead of “nice-to-have.”
Canopy geometry and reflectance inputs
Photometric models fail when the geometry is wrong.
Capture these inputs before you model:
- Canopy plane height: your effective measurement plane (top of canopy, not floor).
- Bench/rack layout: aisle widths and dead zones that alter fixture positioning.
- Mounting structure: trusses, Unistrut, racking obstructions.
- Surface reflectance: ceiling and wall finishes matter. White, clean surfaces reflect more photons; dirty or dark surfaces reflect fewer photons.
Treat reflectance as a variable you can control. If wall finishes and cleanliness aren’t stable, your modeled results won’t be stable either.
Uniformity metrics and test grids
Uniformity is what turns “average PPFD” into predictable crop performance.
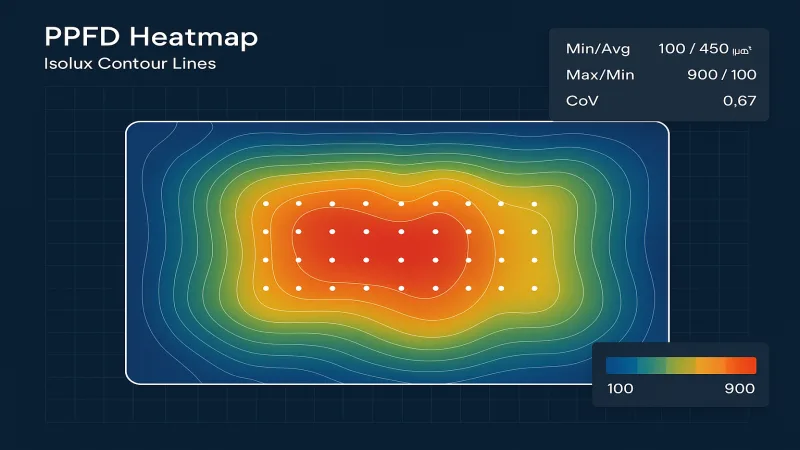
Use three metrics at the canopy plane:
- min/avg (minimum divided by average): higher is better.
- max/min (maximum divided by minimum): lower is better.
- CoV (coefficient of variation): lower is better.
Define a measurement grid before installation—not after you see the numbers. For large rooms, a practical approach is a repeated grid cell (for example, a 5×5 or 6×6 point grid per representative zone) plus targeted measurements at edges and corners where layouts typically fail.
Fixture and spacing strategy
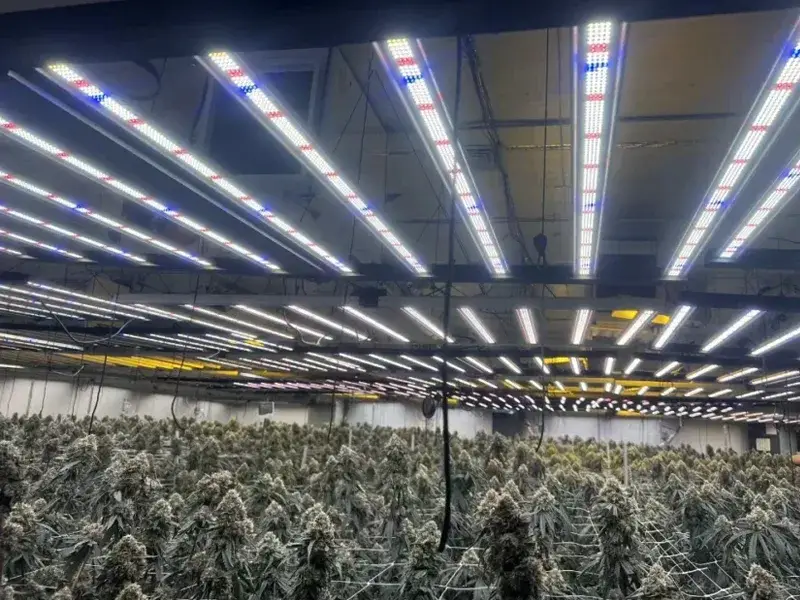
Shortlisting high-efficacy bar fixtures
In a 10,000 sq ft room, bar fixtures win for a practical reason: they distribute photons over a larger emitting area, which helps you hit uniformity targets without extreme mounting heights.
When shortlisting fixtures, treat these as engineering requirements (not marketing bullet points):
- Efficacy (PPE, µmol/J): higher efficacy reduces both electrical cost and HVAC burden per delivered photon.
- Photometric documentation: you need usable PPFD maps at multiple heights, and ideally, IES/LDT files for modeling.
- Component quality and serviceability: drivers, connectors, and surge protection should be specified, not implied.
- Environmental rating: wet-room reality means you should evaluate ingress protection (IP) and corrosion resistance.
SLTMAKS’ positioning is aligned with this evaluation style: spectrum engineering (white base with targeted red and far-red bands) paired with commercial-grade component choices and practical durability considerations like IP guidance. That spectrum approach matters most when you’re trying to standardize results across rooms—because you’re controlling variables, not chasing one-off “hot” harvests.
Mounting height and C–C spacing rules
Spacing is where most layouts either become scalable or become a custom art project.
Use this workflow:
- Pick a mounting height window that you can build and service (clearance for irrigation lines, safety access, and cleaning).
- Start with the manufacturer’s PPFD maps at that height to estimate center-to-center (C–C) spacing.
- Model a repeated tile (a representative grid of fixtures over a representative bench area) before you model the full room.
Rules of thumb that typically hold up in commissioning:
- Lower mount height increases intensity directly under fixtures and increases non-uniformity risk.
- Wider spacing reduces fixture count but increases scalloping (peaks/valleys) unless the emitting area and optics support it.
- Bar fixtures tolerate closer C–C spacing without creating severe hotspots because the sources are distributed.
Treat dimming capability as a design feature, not a nice add-on. If your drivers support 0–10V dimming (or your chosen control topology), you can standardize a single physical layout and tune PPFD by stage via setpoints, instead of re-hanging fixtures.
Edge losses and wall-wash tactics
Large rooms tend to “fail at the perimeter.” The edges see fewer overlapping beams, and reflective behavior changes near walls.
Practical tactics that improve edge performance:
- Perimeter row bias: slightly tighter spacing or slightly different orientation for the outermost rows.
- Wall-wash strategy: place the perimeter fixtures so part of the distribution intentionally covers the wall plane, recovering some reflected photons.
- Keep the wall reflectance real: white walls help only if they stay clean; write cleaning into SOPs.
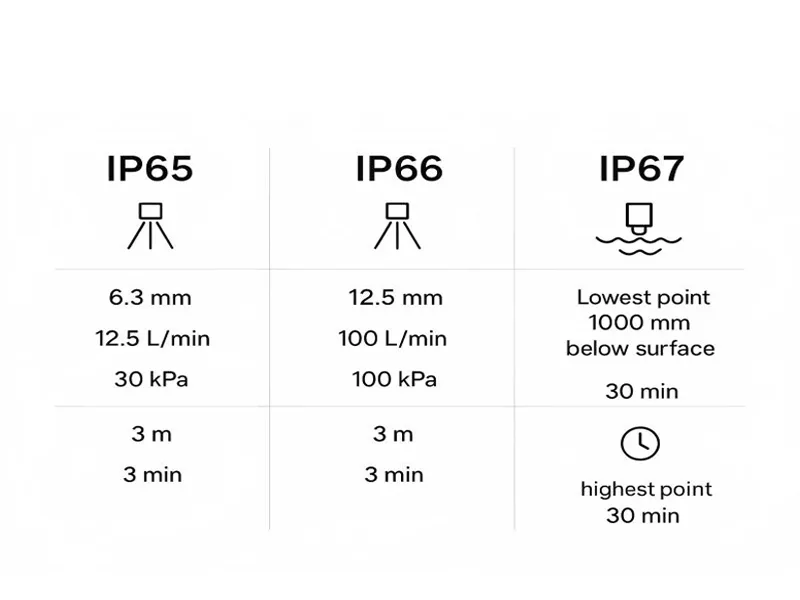
This is also where fixture durability and documentation matter. If you’re running washdown protocols or high humidity, align your fixture selection with an IP approach suitable for wet rooms (many commercial buyers use IP65 as a baseline reference for protection against dust and water jets). SLTMAKS explicitly discusses IP expectations and moisture-resistant design considerations in its LED grow light buyer guide, which can be useful when you’re defining spec language for procurement.
Power, HVAC, and controls integration
Lighting power density and circuiting
Once you can estimate fixture count and operating wattage, convert the layout into a power plan.
Start with lighting power density (LPD) (W/ft²) as a planning number, then refine using your actual fixture wattage and dimming strategy.
Engineering checkpoints:
- Panel capacity and spare ways: leave headroom for expansion and service.
- Circuit loading discipline: size branch circuits and conductors to code, and document the as-built loads.
- Zoning: split the room into control zones that match cultivation reality (e.g., perimeter vs core, or rack zones). Zoning is how you keep uptime when one driver string or one controller segment fails.
Heat load, dehumidification, and VPD impacts
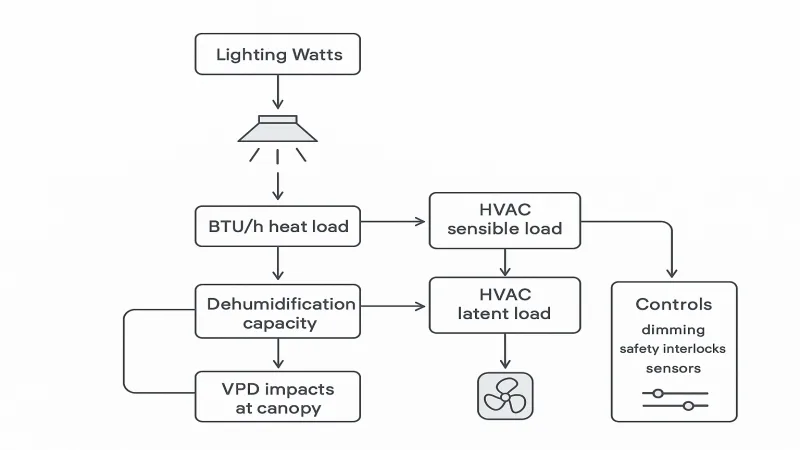
All electrical watts end up as heat in the room. That matters because lighting decisions cascade into HVAC sizing and the plant microclimate.
Translate lighting watts into heat load:
- 1 watt ≈ 3.412 BTU/h (sensible heat input).
Then ask two questions:
- Can the HVAC system remove the added sensible load while maintaining your target leaf/canopy temperature?
- Does the dehumidification strategy still hit humidity setpoints without forcing unstable temperature swings?
Your lighting schedule also changes the transpiration dynamics. If you dim aggressively or shift photoperiods, you can change vapor pressure deficit (VPD) behavior even if air temperature is constant. Treat lighting, HVAC, and dehumidification as a coupled system.
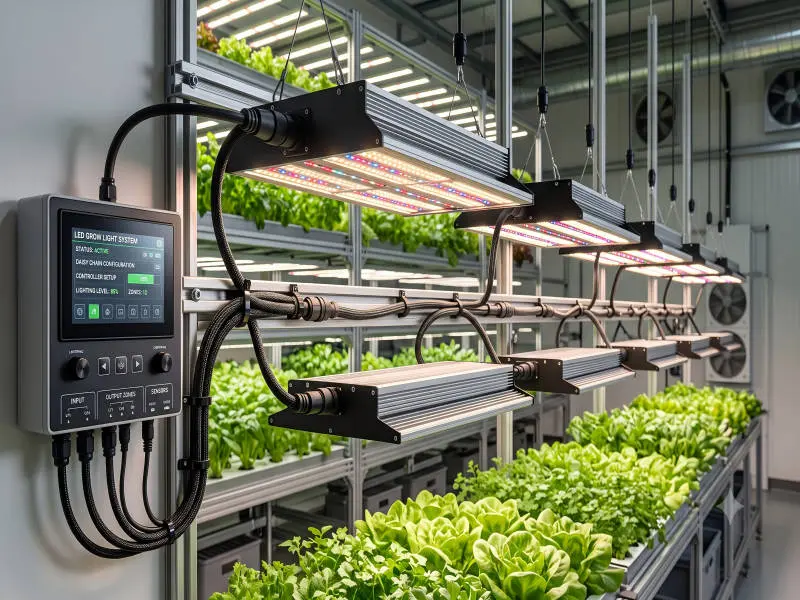
Dimming topology and safety interlocks
Controls design is where “works in a demo room” becomes “works at scale.”
Define your dimming topology early:
- Control signal type (commonly 0–10V, but follow your selected driver/control system)
- Zoning and addressing (how you group fixtures)
- Fail-safe behavior (what happens on signal loss)
Then build interlocks appropriate to your facility risk model:
- E-stop integration so lighting can be made safe during emergency response.
- Over-temp or fault behavior if your system monitors the driver or fixture temperature.
- Sequencing with HVAC so ramp changes don’t shock the room’s thermal balance.
Compliance, safety, and rebates
UL 8800, IP, FCC, and NEC considerations
Compliance is not a box you check at the end. It should shape what you buy and how you install it.
Practical considerations to align early with your electrical contractor and authority having jurisdiction (AHJ):
- NRTL listing (UL/ETL): In many US jurisdictions, luminaires and drivers are expected to be listed by a Nationally Recognized Testing Laboratory (NRTL). Confirm the exact listing and mark/label expectations before procurement.
- Ingress protection (IP): If your room is treated as a wet environment (washdown, high humidity, aggressive cleaning), IP ratings and connector choices materially affect reliability.
- EMI/EMC (FCC): If drivers or controls introduce interference, it becomes an operational problem fast (sensor noise, control instability). Verify FCC/EMC posture where relevant.
- NEC installation discipline: Cable management, strain relief, connector ratings, and labeling impact inspection outcomes and long-term serviceability.
This is an area where vendor documentation quality matters as much as the fixture. SLTMAKS’s content highlights the inspection reality (UL/ETL as practical requirements, IP65-style protection as a wet-room consideration, and warranty coverage as downtime control), which is the right mindset: treat documentation and certifications as part of your system design, not marketing collateral.
DLC QPL eligibility and version checks
If you’re planning around utility incentives, confirm DesignLights Consortium (DLC) horticultural eligibility early.
Two practical rules:
- Do not assume a fixture is on the DLC Qualified Products List (QPL) just because a brochure says “rebate eligible.” Verify the exact model number and configuration.
- Check the program version and the requirements your utility uses. Programs evolve, and a model can fall out of eligibility if the listing changes or a version updates.
Documentation for AHJ and utility programs
Build a documentation packet you can reuse room to room:
- Lighting plan (fixture layout, mounting heights, zoning)
- Photometric model outputs (PPFD map and uniformity metrics)
- One-line electrical diagram + panel schedules
- Cut sheets + listing documentation (NRTL marks, environmental ratings)
- Controls narrative (dimming method, zones, interlocks)
- Commissioning report template (grid results, meter calibration notes)
“Done when”: your AHJ packet is complete before install, and your rebate packet can be assembled without chasing missing PDFs at the end.
Commissioning and ongoing optimization
Grid mapping with calibrated PAR meters
Commissioning is where you earn the numbers you modeled.
Use calibrated PAR meters and a defined method:
- Measure at the canopy plane (or the agreed reference plane if canopy height varies).
- Use your pre-defined grid and record point IDs so results are repeatable.
- Capture the operating condition: dimming setpoint, photoperiod, fixture height, and any CO₂ enrichment state that affects target choices.
If the measured map diverges from the model, don’t “average it away.” Identify whether the issue is:
- fixture orientation/height drift
- control zone mismatch
- driver output variation
- reflective surface differences
Setpoint tuning and seasonal adjustments
Once your physical layout is fixed, optimize with controls:
- Stage tuning: run veg/flower setpoints using dimming to match your PPFD/DLI table.
- Perimeter correction: fine-tune perimeter zones if edge losses show up on maps.
- Seasonal tuning: facility intake conditions change seasonally; HVAC headroom and dehumidification behavior can shift the maximum sustainable lighting power.
This is where warranty and logistics become operational—not contractual. A defined warranty period and responsive replacement process reduce downtime risk when you standardize a layout across multiple facilities. SLTMAKS, for instance, states a 3-year warranty and highlights local warehouse logistics in North America and Europe in its brand profile—use those sorts of operational details as evaluation criteria across vendors, not as marketing claims.
Maintenance SOPs and sensor calibration
Write the maintenance plan as if you expect to operate for years:
- Cleaning cadence (fixtures, optics, and reflective surfaces)
- Fastener and hanger inspection (vibration and corrosion are real)
- Driver and connector checks (heat cycles loosen things)
- Spare parts strategy (drivers, connectors, a small fixture buffer)
- Sensor calibration schedule (PAR meters, environmental sensors)
“Done when”: maintenance SOPs exist before the first harvest, and sensor calibration logs are auditable.
Conclusion
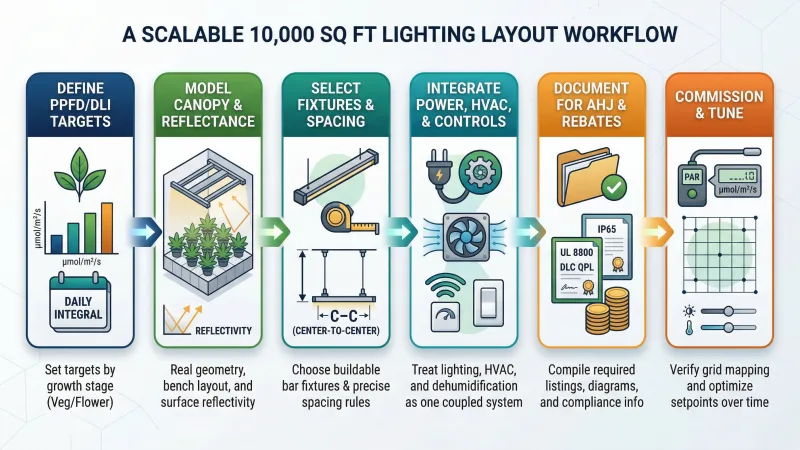
A scalable 10,000 sq ft lighting layout follows a repeatable path: define PPFD/DLI targets → model with real canopy geometry and reflectance → choose fixtures and spacing rules you can actually build → integrate power, HVAC, and controls as one system → document for AHJ and rebates → commission with grid mapping, then tune setpoints over time.
If you want a single set of acceptance checks to standardize across rooms, start at the canopy plane and keep them measurable:
- min/avg ≥ 0.7
- max/min ≤ 1.6
- CoV ≤ 0.20
When those checks are paired with inspection-ready documentation and a controls plan that supports dimming and interlocks, you get the real commercial outcomes: predictable yield across benches, fewer HVAC surprises, higher uptime, and a layout you can replicate across multiple sites without reinventing the room every time.
FAQ
What is the difference between PPFD and DLI in commercial cannabis cultivation?
PPFD (photosynthetic photon flux density) measures the instantaneous photon density at the canopy, while DLI (daily light integral) measures the total amount of photons delivered per day. PPFD targets must be paired with a photoperiod to be meaningful, because veg rooms and flower rooms run on different hourly schedules (e.g., 18 hours vs. 12 hours).
How do you prevent edge losses and improve light uniformity in a large grow room?
Large grow rooms often suffer from reduced light performance at the perimeter because the edges receive fewer overlapping beams. To improve this, you can apply a perimeter row bias, which involves tighter spacing or a different orientation for the outermost rows. Additionally, implementing a wall-wash strategy intentionally directs some light onto the wall plane to recover reflected photons.
How do commercial grow lights impact HVAC and dehumidification requirements?
All electrical watts from lighting are ultimately converted into heat inside the room, with 1 watt equaling approximately 3.412 BTU/h of sensible heat input. u003cbru003eu003cbru003eu003cbru003eBecause lighting schedules and dimming directly affect plant transpiration and vapor pressure deficit (VPD), lighting, HVAC, and dehumidification must be engineered as a single coupled system.
What certifications are required to qualify for commercial grow light utility rebates?
To be eligible for utility incentives, you must confirm that the exact fixture model and configuration is currently listed on the DesignLights Consortium (DLC) Qualified Products List (QPL). You should also ensure the equipment meets local compliance standards, which generally require NRTL listings (such as UL or ETL) and appropriate Ingress Protection (IP) ratings for wet environments.
Why are bar fixtures recommended for large-scale commercial grow rooms?
In a 10,000 sq ft facility, bar fixtures are highly practical because they distribute photons over a larger emitting area. This design helps cultivators hit uniformity targets without requiring extreme mounting heights. Additionally, bar fixtures can tolerate closer center-to-center (C–C) spacing without causing severe hotspots because their light sources are evenly distributed.
What are the key metrics used to measure light uniformity at the canopy plane?
Uniformity is critical because it turns u0022average PPFDu0022 into predictable crop performance. There are three main metrics to evaluate at the canopy plane: the minimum divided by the average (min/avg), where a higher number is better; the maximum divided by the minimum (max/min), where a lower number is better; and the coefficient of variation (CoV), where a lower number is also better. To standardize acceptance checks across multiple rooms, facilities should target a min/avg ≥ 0.7, a max/min ≤ 1.6, and a CoV ≤ 0.20.