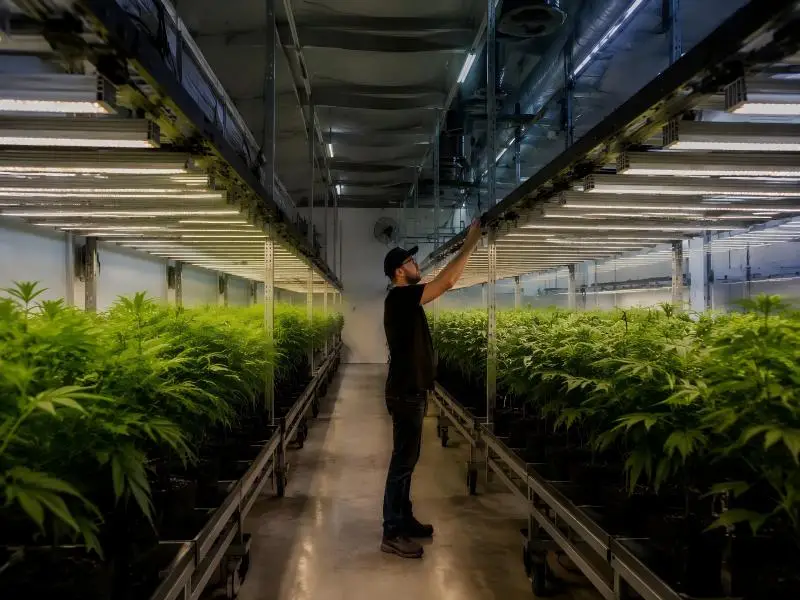
You already know LEDs belong in the room. The open question is where they hang, how far apart, and how you prove the canopy is even before the first crop goes in. This guide walks through a layout that holds up on moving benches, focusing specifically on optimizing rolling bench grow lights: setting PPFD and uniformity targets by stage, deriving spacing from the fixture’s own photometric file rather than a square-footage rule, mapping the canopy at both ends of bench travel, and closing the loop with controls, wiring, and commissioning checks.
The stakes are not abstract. Lighting has been measured at roughly two-thirds of facility electricity in surveyed Northwest grows, with a range of 38% to 66% across studies (Northwest Power and Conservation Council cannabis report, 2019), so a layout that misses its target wastes the largest single load in the building. By the end, you will have a repeatable method for configuring rolling bench grow lights and a checklist for verifying the result.
SLTMAKS is a global provider of professional-grade LED grow lights, engineering full-spectrum fixtures with advanced thermal management for cultivators ranging from home hobbyists to large-scale commercial operators. Its work on spectral science and fixture cooling is directly relevant to planning light placement and spacing over rolling benches in cannabis facilities.
Introduction
This guide is for commercial cannabis growers who already run rolling benches and need a layout that hits their own PPFD and DLI targets evenly across every bench position, without wasting electricity. It walks through the full sequence: setting light-level and uniformity targets, deriving mounting height and spacing from the fixture’s photometric data, checking controls and HVAC coordination, and confirming the wiring and service clearances a moving bench row demands. The payoff is a layout you can verify with a PPFD map before you buy, not after.
The stakes are straightforward. Lighting has been measured at roughly two-thirds of facility electricity in surveyed Northwest grows, with a range of 38% to 66% across studies (Northwest Power and Conservation Council cannabis report, 2019). Layout decisions drive both that bill and whether your canopy receives the uniformity your cultivar needs.
Table of Contents
Set Targets: Light Levels and Uniformity
The design work starts with numbers, not fixtures. Before anyone measures a bench or picks a bar, write down the PPFD and DLI you intend to hit at canopy level, and the uniformity you will accept across the canopy. Everything downstream- mounting height, spacing, overlap, dimming schedule, is a way of reproducing those numbers in a room where the benches move.
PPFD and DLI by Stage
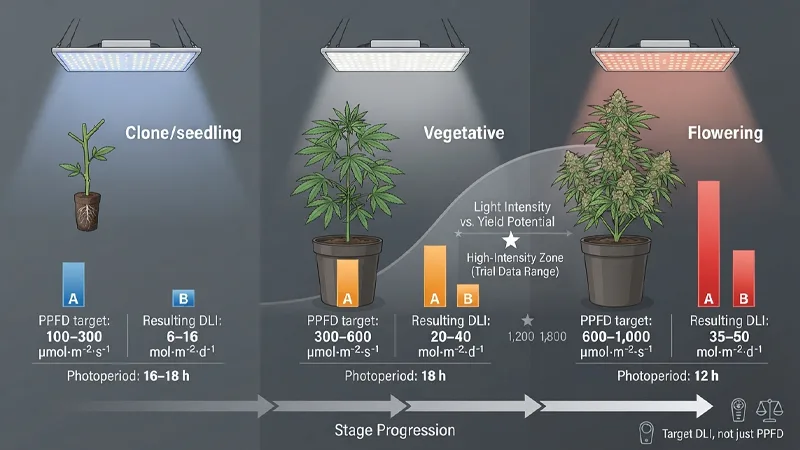
Cannabis responds to light intensity across a very wide range, and the stage determines where you sit inside it. In a controlled indoor trial that pushed flowering PPFD from 120 to 1,800 µmol·m⁻²·s⁻¹, yield scaled with intensity up to roughly 1,800 µmol·m⁻²·s⁻¹, moving from 116 to 519 g·m⁻² across the tested levels (Rodriguez-Morrison, Llewellyn & Zheng, Frontiers in Plant Science, 2021). The same trial ran vegetative at about 425 µmol·m⁻²·s⁻¹ over 18 hours, a DLI of 27.5 mol·m⁻²·d⁻¹, with rooting cuttings held near 100 µmol·m⁻²·s⁻¹.
Most commercial rooms do not run at the top of that range. A widely repeated commercial starting point is 100–300 PPFD for clones and 600–1,000 for flower, with vegetative crops around 300–600 PPFD (Thrive Agritech, cannabis PPFD stage targets, 2026). Treat those as a starting envelope, then set your own target from the cultivar, the CO₂ level you actually maintain, and the electricity budget you are willing to carry.
| Stage | PPFD target | Photoperiod | Resulting DLI |
|---|---|---|---|
| Clone/seedling | 100–300 | 16–18 h | 6–16 |
| Vegetative | 300–600 | 18 h | 20–40 |
| Flowering | 600–1,000 | 12 h | 35–50 |
Uniformity Benchmarks
Average PPFD tells you how much light the room delivers. Uniformity tells you whether every plant gets it. In photometric practice, uniformity is usually expressed as the minimum-to-average ratio, with the coefficient of variation capturing the overall spread across the grid.
For a rolling-bench room, three acceptance checks are publishable as a house standard: min/avg ≥ 0.7, max/min ≤ 1.6, and CoV ≤ 0.20 (SLTMAKS commercial grow light layout guide, 2026). These are not a vendor-specific benchmark. They are the kind of threshold any layout can be held to, and they are the numbers your commissioning measurement either passes or fails.
Key Takeaway: Hold the layout to three acceptance checks: min/avg ≥ 0.7, max/min ≤ 1.6 and CoV ≤ 0.20, measured on a grid you define before installation.
Validation Strategy Overview
Decide now how you will prove the layout works, because retrofitting a measurement plan onto a finished room is expensive. Define the measurement grid before installation: a 5×5 or 6×6 point grid per representative zone, plus targeted edge and corner points where the bench travel extremes and the room perimeter sit (SLTMAKS, 2026).
Two limits are worth stating plainly. The intensity response above comes from a single controlled trial, not a multi-site commercial dataset, so it describes a curve rather than a guaranteed yield. And no independent test data was found that validates these uniformity thresholds specifically for moving-bench geometry, which is why the grid you commit to matters more than the headline number.
Layout Methodology for Rolling Bench Grow Lights
Layout for rolling benches starts from three numbers you control: mounting height, centre-to-centre (C–C) spacing, and the travel range of each bench. Set them in that order, because each one constrains the next.
Mounting Height and Fixture Orientation
Mounting height sets the trade-off between coverage and intensity. Lowering fixtures raises PPF density over the canopy but increases non-uniformity risk, since the distance between fixture and canopy shrinks faster than the spacing between fixtures (SLTMAKS commercial grow light layout guide, retrieved 2026-04-04). Bar-style fixtures tolerate closer C–C spacing without severe hotspots because their light sources are distributed along the bar rather than concentrated at a point.
Orientation follows the bench: run bars along the bench length so the long axis of the emitting area matches the long axis of the canopy.
Spacing and Overlap Across Benches
Wider spacing reduces fixture count but increases scalloping, the peaks and valleys between fixture rows, unless the emitting area and optics support the wider pitch (SLTMAKS, retrieved 2026-04-04). Treat the outermost rows as a separate problem: large rooms commonly fail at the perimeter, and the standard remedy is perimeter row bias, meaning tighter spacing or a different orientation for the outer rows, plus a wall-wash strategy.
Verify your result: measure PPFD on a 5×5 or 6×6 grid across the canopy, not just under a fixture.
PPFD Mapping with Bench Travel Extremes
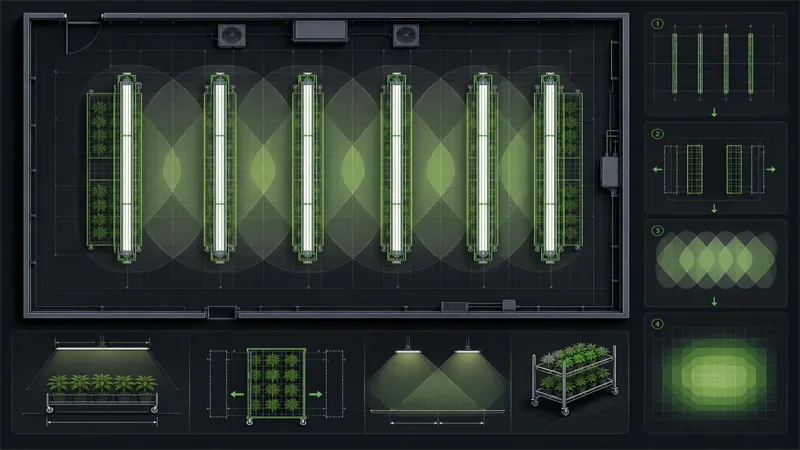
Rolling benches trade fixed aisles for travel, so the lighted rectangle shifts with the benches (Southwest Solutions horticulture rolling bench systems, retrieved 2026-08-10). Define the effective lighted rectangle at three positions: left extreme, right extreme, and centred. The largest PPFD deltas appear at outer edges and corners, where fewer fixtures contribute, and edge loss is greatest.
A PPFD map is only valid at the height and footprint it was measured at, so a map supplied for a fixed 4×4 ft area does not transfer to a travelling bench without re-measurement.
Pro Tip: Map at the left extreme, right extreme, and centred positions. A layout that passes only in the centred position will fail at the edges once the benches move.
Fixture Selection and Photometrics
The fixture you choose sets the ceiling on what any layout can achieve. A bar-style LED grow light with a high PPE gives you more photons per watt, but the number that matters for layout is the published PPFD map: it tells you what the fixture actually delivers at a given mounting height, and whether that pattern survives bench travel.
Bar-Style Form Factor and PPE
Bar-style fixtures spread diodes across a long, narrow body, which suits rolling benches because the light footprint matches the bench footprint instead of pooling in the center. Efficiency is where listings now separate products. The DLC’s V4.0 horticultural requirements, effective 18 April 2025, set the listing floor at 2.5 µmol·J⁻¹, an 8.7% increase over V3.0, and will delist roughly 11% of the least efficacious qualified products. The qualified products list had grown past 1,200 V3.0-listed models from more than 130 manufacturers as of February 2025, so the floor is a filter, not a differentiator. Treat PPE as a starting screen, then compare fixtures on the photometric file.
Photometric Files and PPFD Maps
Ask every vendor for the IES or LDT file and the test report behind the PPFD map. Check the mounting height, ambient temperature, and whether the test used a reflective room or an open bench. A vendor’s published layout guide is a reasonable place to start: SLTMAKS publishes acceptance checks of min/avg ≥ 0.7, max/min ≤ 1.6, and CoV ≤ 0.20, which are standard practice across bench layouts rather than a proprietary method. Run your own map against those thresholds before you commit.
Warning: A manufacturer PPFD map is measured in one specific test configuration. In a reflective room with walls, benches, and adjacent fixtures, your measured values will differ, sometimes by double digits at the perimeter.
Controls Compatibility and Dimming
Confirm the fixture’s dimming protocol before you buy, because it determines whether you can run stage recipes or only on/off cycles. Documented 0–10 V compatibility lets you ramp PPFD and DLI by stage and coordinate with CO₂ and VPD targets. Check the driver’s dimming range and minimum output, since some fixtures cut out below 10% and give you a step instead of a ramp. Also verify the fixture carries UL 8800, the horticultural lighting safety standard first published in 2019, along with ETL, CE, or RoHS marks as your jurisdiction requires.
Controls, HVAC, and Crop Coordination
Dimming, CO₂, and VPD recipes, and dehumidification only fight each other when they are treated as one control problem. Split them by load type, and they sequence cleanly: lighting heat is a sensible load, and one kilowatt of fixtures adds about 3,412 BTU/hr (Greenzone Engineering, retrieved 2026-04-09). Transpiration is the latent load, and its peak does not line up with the lighting peak.
0–10 V Networks and Ramping
A 0–10 V dimming bus is the simplest way to make light output a controllable variable rather than a fixed block. Ramp fixtures up over several minutes at lights-on and down at lights-off instead of switching the full bank at once. That spreads the sensible load step, keeps the 0–10 V signal wiring separate from mains runs, and gives the HVAC controller a gradual signal to track rather than a cliff.
CO₂, VPD, and Stage Recipes
Enrichment and VPD targets belong to the crop recipe, not the lighting schedule. Because dimming changes PPFD without changing the recipe, a stage recipe should be written against delivered light, not against fixture count. If a ramp reduces output for the first ten minutes of the photoperiod, the recipe’s DLI target still has to be met across the full lights-on window.
HVAC and Dehumid Sequencing
Model lights-on and lights-off as two separate cases. During lights-on, size cooling to the combined sensible load of the fixtures plus any dehumidification reheat. At lights-off, the sensible load collapses while moisture from the canopy stays high, so dehumidification must remain available independently rather than being interlocked to the lighting circuit. Sizing one peak case for both conditions is the most common coordination error in bench rooms, and it shows up as either short cooling capacity at midday or an undersized dehumidifier at night.
Compliance, Safety, and Wiring for Moving Benches
Rolling benches turn a fixed electrical installation into a moving one, so the compliance question is not whether flexible cord is allowed but where it is allowed and how it is supported. The NEC addresses horticultural lighting directly in Article 410, Part XVI, and its flexible-cord allowance at 410.178 permits cord-and-plug connection for listed luminaires in this occupancy. That allowance comes with conditions: the cord must be protected from physical damage, and the connection method must tolerate repeated repositioning.
Listings, Ratings, and Code Notes
Start with the listing. A luminaire intended for a grow room should carry a damp or wet location rating appropriate to the room’s humidity and washdown practice, and an ingress protection rating that matches actual conditions rather than a marketing claim. UL 8800 is the standard that evaluates horticultural luminaires, including the connection methods that support repositioning, so a fixture listed to it has been assessed for the movement your benches create. Your AHJ will want the listing documentation, the fixture cut sheets, and a wiring method that matches the installation instructions.
Flexible Wiring, Strain Relief, and Access
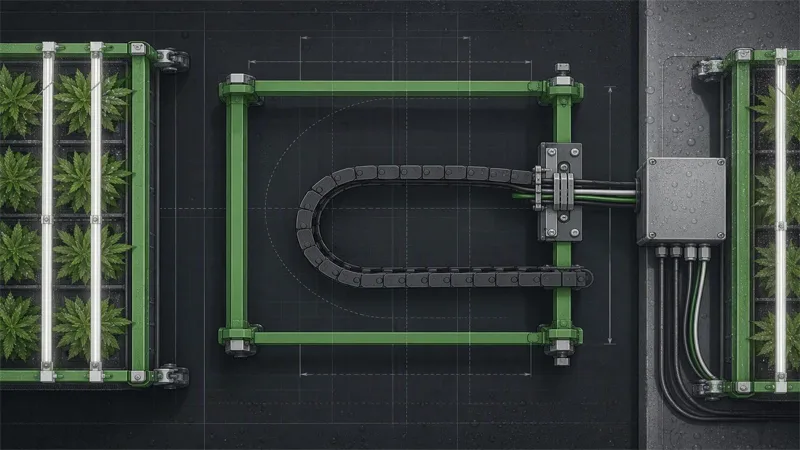
Cable carriers, also called drag chains, are the usual answer for bench travel. The carrier holds the cord in a controlled loop so it cannot pinch, abrade, or pull on the fixture connection at either end of travel. Strain relief belongs at both terminations, and the carrier should be sized for the full travel distance plus the bend radius the cord manufacturer specifies. Where a carrier is impractical, an overhead drop with a slack loop works only if the loop cannot contact the bench, the canopy, or standing water.
Maintenance, LOTO, and Service Clearance
Warning: Lock out and tag out the circuit, and confirm zero energy, before any work on a bench, fixture, or carrier. Never service a fixture while another operator can move the bench.
Service clearance matters as much as the wiring. Leave enough room at the end of travel to reach terminations without standing on a bench, and keep disconnects accessible from the aisle rather than behind the canopy.
Conclusion
You now have the full sequence: set PPFD and DLI targets by stage, hold uniformity to a defined acceptance check, derive mounting height and spacing from the fixture’s own PPFD map rather than a square-footage rule, then verify the result on the canopy with the benches at both travel extremes.
Three next actions matter most. Commission the room with a grid measurement before the first crop goes in, then re-map after any change to mounting height, fixture model, or bench configuration. Review your utility incentive paperwork early, since rebate programs usually require documentation of the installed layout and its measured performance. And keep lighting decisions tied to the HVAC and compliance work: a layout that meets its uniformity target but blocks service clearance or overloads the dehumidification sequence is not finished.
Before you commit the layout, review the photometric files and talk to an expert. The published acceptance criteria used here, including the minimum-to-average ratio and coefficient-of-variation checks, are standard practice across bench layouts, and SLTMAKS publishes one such set alongside its spacing guidance. Treat any LED grow light specification for rolling benches as a starting point to test against your own room, not a substitute for measuring it.
FAQ
How far apart should LED grow lights be spaced over rolling benches?
There’s no single number, because spacing depends on mounting height, fixture wattage, and the beam pattern in the fixture’s photometric file. The reliable way to set it is to fix your target PPFD first, then read the fixture’s PPFD map to see what centre-to-centre (C–C) pitch reproduces that target at your chosen height. A common failure is copying a spacing rule from a fixed 4×4 ft layout onto a travelling bench, where the lighted rectangle shifts. Set the C–C spacing on a grid, then confirm it with a 5×5 or 6×6 canopy measurement rather than trusting the drawing.
What PPFD and DLI should cannabis receive in veg and flower?
Use stage-based starting points and adjust from there. A widely repeated commercial envelope is 100–300 PPFD for clones and seedlings, 300–600 for vegetative growth over 18 hours (a DLI of 20–40), and 600–1,000 for flowering over 12 hours (a DLI of 35–50). Those ranges are a starting point, not a ceiling. In a controlled indoor trial, flowering yield scaled with intensity up to roughly 1,800 µmol·m⁻²·s⁻¹ (Rodriguez-Morrison, Llewellyn & Zheng, Frontiers in Plant Science, 2021). Set your own target from the cultivar, your maintained CO₂ level, and your electricity budget.
How do you check that light is even across a rolling bench?
Averaging is not enough, so measure uniformity as well as intensity. In photometric practice, express it as a minimum-to-average ratio, plus a coefficient of variation, and hold the layout to a defined pass/fail check such as min/avg ≥ 0.7, max/min ≤ 1.6, and CoV ≤ 0.20 (SLTMAKS commercial grow light layout guide, 2026). Define a 5×5 or 6×6 grid before installation; add edge and corner points where bench travel extremes and the room perimeter sit, then map the canopy with the benches at the left extreme, right extreme, and centred positions.
What wiring and safety rules apply to lights over moving benches?
Treat the moving bench as a moving electrical installation. The NEC addresses horticultural lighting in Article 410, Part XVI, and its flexible-cord allowance at 410.178 permits cord-and-plug connection for listed luminaires, provided the cord is protected from physical damage, and the connection tolerates repeated repositioning. Cable carriers, also called drag chains, hold the cord in a controlled loop so it can’t pinch or pull at either end of travel, with strain relief at both terminations. A grow-room luminaire should also carry an appropriate damp location rating and a UL 8800 listing, which evaluates the repositioning tolerance your benches demand.