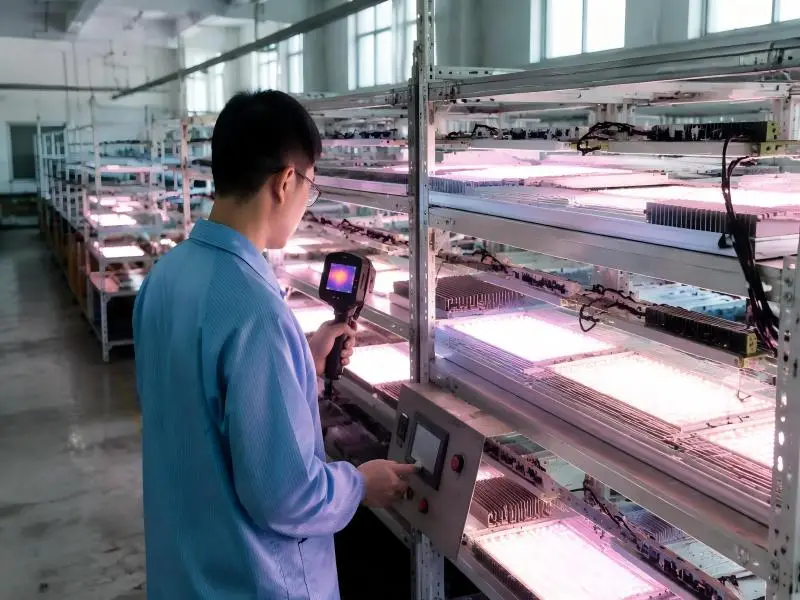
LED grow light quality control is only as strong as the aging step inside it, and that step is the one most suppliers describe in adjectives rather than records. A real LED grow light aging test is a scheduled production operation: fixtures run at a defined load for a defined period, and the line records the duration, the load, and the outcome for every unit before optical calibration and packing (SLTMAKS, 2026). That record is what a factory audit of the aging line should ask to see.
The purpose is narrow and worth stating plainly. An aging screen flushes out infant-mortality failures, the driver electronics, solder and interconnect joints, and LED module defects that surface under heat, load and time (U.S. Department of Energy, LED Luminaire Lifetime, 2014). It does not prove a fixture will still hit its rated output in year eight. Passing burn-in means the unit survived the window it was screened in, nothing more.
Introduction
Aging is the last stage of LED grow light quality control before packing: every unit runs at production-line load for a fixed period while its electrical, thermal, and optical behavior is recorded. The purpose is narrow and specific. An LED grow light aging test flushes out infant-mortality failures, the driver electronics, solder and interconnect joints, and LED module defects that only surface under heat, load, and time (U.S. Department of Energy, LED Luminaire Lifetime, 2014). It does not predict year-eight output, and any supplier implying otherwise is overstating the test.
What a documented protocol looks like in practice is a 48-hour aging run at the production line plus strict optical calibration before packing, with the duration, the load, and the outcome recorded for every unit (SLTMAKS, How to Audit an LED Grow Light Factory On the Scene, 2026). That record is also what a factory audit of the aging line should ask to see.
This guide walks the full flow, from incoming inspection to final QA, then the burn-in setup, the parameters measured during aging, the failure modes the screen catches, and the documentation that ties a serial number back to its test data.
Table of Contents
From IQC to Final QA: The Flow
A grow light quality control process runs from incoming material to packed carton, and the aging test is one station inside it, not the whole inspection. Knowing the sequence matters because it tells you which failures a supplier can catch before a fixture ever reaches your ceiling, and which ones only show up after months of operation. An audited factory flow covers compliance and listing checks, SMT and PCBA work under ESD controls, and pre-shipment inspection before packing, with a short burn-in screening early failures before fixtures ship (SLTMAKS, How to Audit an LED Grow Light Factory On the Scene, 2026-09-01).
Incoming and In-Process Checks

Incoming inspection verifies what arrives: LED packages and binning codes, driver boards, heat sinks, lenses, and cable assemblies, checked against the approved specification and against compliance and listings documentation. In-process checks follow the build through SMT and PCBA, where ESD controls protect driver and control circuitry from handling damage that would otherwise surface as a field failure.
Safety and Electrical Verification
Before optical testing, each unit gets its electrical and safety pass: dielectric strength, ground continuity, leakage current, and a power-on check that the driver starts and holds its rated output. These are pass/fail gates. A unit that fails here never reaches the aging rack.
Optical Validation before Shipment
The last stage before packing confirms output rather than endurance: luminous flux, correlated color temperature, and spectrum shape against the declared specification. Pre-shipment inspection then checks the finished fixture, its accessories, and its labeling before the carton is sealed. Aging sits between the electrical gate and this final optical check, which is where the next section picks up.
Burn-In Protocol and Setup
Burn-in is not a formality between assembly and packing. It is the stage where a fixture runs under load long enough for early-life failures to surface inside the factory instead of inside a grow room.
Duration and Operating Conditions
Commercial lighting burn-in duration commonly runs 8 to 24 hours, with 24 hours the most common choice; published schedules list 2 h, 8 h, and 24 h as the typical options (Pstar LED, Why 100% Aging Testing Matters for Commercial Lighting, retrieved 2026-05-08). Fixtures are operated at 100% power, continuous load, in installation-like conditions.
The trade-off is honest: 2 hours catches gross assembly errors, 8 hours catches most connector and solder faults, and 24 hours is the point where marginal driver components and weak wire bonds usually declare themselves. Longer burn-in costs rack time and energy, so the defensible choice is the shortest duration that still screens the failure modes you care about. A burn-in test for LED grow lights should be specified by what it screens, not by how long it sounds.
Station Configuration and Monitoring
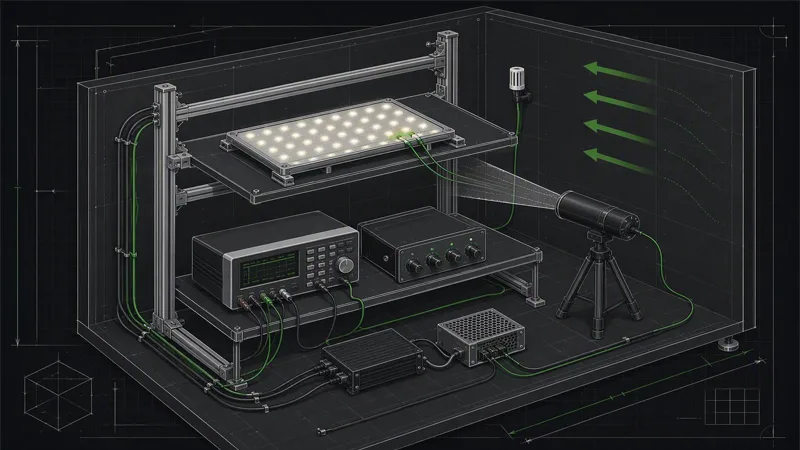
Aging racks hold fixtures at their rated mounting orientation, powered through the same driver and dimming path they ship with. Ambient temperature is logged at rack level, and thermocouples sit on the driver case, the LED array substrate, and the heatsink base. The station logs temperature, input and output voltage and current, power factor, THD, and the dimming control signal (SLTMAKS, Testing LED Grow Light Drivers for Lifespan and Uptime, retrieved 2026-09-17). Sampling at 1 Hz is too slow to catch transient events at low dim, so the logger runs faster than the fault it is trying to see.
Pro Tip: Write the acceptance gate into the purchase order instead of accepting a verbal “we age everything.” State the test standard, stress level, duration or cycle count, sample size, and pass/fail criterion, and require the logged data with the shipment.
Acceptance Criteria and Escalation
An acceptance gate needs those five fields stated explicitly: test standard, stress level, duration or cycle count, sample size, and pass/fail criterion. Without a stated sample size, “100% aging” is a claim about effort rather than a claim about coverage.
Escalation follows the data. A single fixture that fails a gate is quarantined and torn down to root cause. A failure that repeats within a batch triggers a hold on the batch, a review of the incoming component lots, and a re-run under the same conditions before release. The point is not to fail more units; it is to make sure the units that would have failed in month three fail here, where the fix is cheap.
What We Measure During Aging
Aging logs are only useful if they record the right parameters at the right resolution. For horticultural grow-light drivers, the test log should record temperature, input voltage and current, output voltage and current, power factor, THD, and the dimming control signal, and should sample fast enough to catch transients, where 1 Hz is insufficient (SLTMAKS, Testing LED Grow Light Drivers for Lifespan and Uptime, 2026-09-17). A pass/fail stamp without that log is unverifiable, which is why the LED grow light aging test is judged on its record, not its verdict.
Electrical and Driver Stability
Drift tracking covers output current regulation across the full dim range and efficiency at 100%, 50%, and minimum output, repeated at the top of the thermal envelope (SLTMAKS, 2026-09-17). Repeating at the thermal limit matters because that is where regulation and efficiency degrade first.
Power quality has a published floor. The DLC Horticultural Technical Requirements require measured power factor ≥ 0.90 and current THDi ≤ 20%, at any reported input voltage at full output or in the non-dimmed state, verified by benchtop electrical testing or ANSI/IES LM-79.
Thermal Behavior and Hotspot Control
Temperature is logged at the driver, the board, and the case so that a hotspot is located, not just detected. Readings are compared against the binning limit for the LED package in use.
Optical Output, Spectrum, and Flicker
Optical checks confirm output holds through the run, that spectrum stays within the binning tolerance, and that flicker stays inside the declared range at each dim level.
Key Takeaway: Ask for logs covering temperature, input and output voltage and current, power factor, THD and the dimming signal, sampled fast enough to catch transients, plus power factor ≥ 0.90 and THDi ≤ 20%.
Failure Modes Caught Early
Aging screens catch infant mortality: the small share of units that would fail in the first weeks of service because of a marginal solder joint, a mis-binned diode, or a driver that drifts out of regulation once it is warm. What a burn-in cannot prove is long-term parametric drift, so a report that claims ten-year lumen maintenance on the strength of a 72-hour test is overreaching. The value of the screen is narrower and more practical: it moves failures that would otherwise land in your grow room into a bay where they cost a rework, not a crop.
The failure categories below stay separate on purpose. “Quality issue” is not a root cause, and a supplier who reports one cannot tell you which corrective action was taken.
| Symptom observed | Most likely root cause | Where the screen catches it |
|---|---|---|
| Fixture dead on arrival or dead after a few days | Driver or power electronics | Burn-in, first hours |
| Output drops and does not recover | LED package or array degradation | Burn-in, optical check at end |
| Visible dimming, flicker, or colour shift | Driver, dimming circuit, or control wiring | Burn-in, flicker and spectrum measurement |
| One region of the canopy underperforms | Thermal assembly, poor die attach, or heatsink contact | Thermal imaging during burn-in |
| Unit runs hot at the driver, not the LEDs | Driver placement or airflow design | Thermal imaging during burn-in |
Driver, Control, and Wiring Issues
Power electronics dominate fixture failures. TSRgrow’s analysis of cannabis lighting downtime reports that ballasts and drivers are “the single most common failure point in LED grow lighting systems, responsible for an estimated 80% to 90% of all fixture failures.” That is a vendor estimate rather than an audited field study, but it matches what an aging bay shows: most early deaths are electrical, not optical. A burn-in that logs driver output current, case temperature, and dimming response will surface a marginal driver before it reaches a rack.
LED Package/Array and Binning Defects
Package-level defects show up as output that sags during the run and does not recover, or as a colour shift against the batch reference. Binning errors are quieter: a mis-binned array still lights, but its spectrum sits outside the tolerance the crop plan assumes. Comparing each unit’s optical reading to the batch reference at the end of burn-in is what turns a binning error into a documented rejection instead of a mystery in week six.
Thermal Assembly and Dimming Anomalies
Thermal faults are assembly faults. A void in the die-attach layer or a heatsink that is not seated shows up as one LED running hotter than its neighbours, which is why hottest-LED tracking during the run matters more than an average case temperature. Dimming anomalies sit in the same family: a unit that flickers at 10% dim or steps unevenly across the control range usually has a control-wiring or driver-interface problem, not an LED problem.
PPFD Uniformity and Spectrum Consistency
Uniformity is a system property, not a single-fixture property. Aging confirms that each unit’s output and spectrum match the reference; the layout check confirms that the fixtures together deliver even PPFD across the canopy. A batch that passes individually can still fail as an installation if the beam distribution is inconsistent unit to unit.
HVAC Predictability and Energy Performance
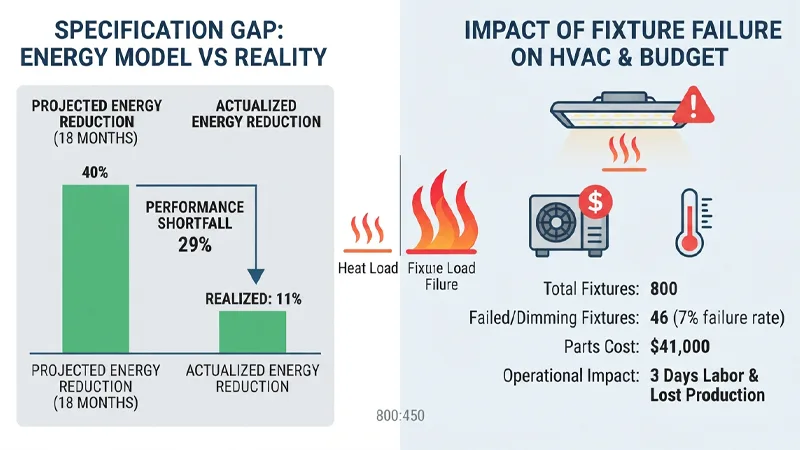
Fixture efficiency sets the heat load your HVAC has to remove, so a batch that draws more than specified quietly raises both cooling cost and canopy temperature. Nanolux Tech’s 2026 commercial grow light overview describes a single-site rollout of 800 fixtures in which 9 failed and 37 more showed visible dimming within 18 months, a 7% failure rate the operator put at “$41,000 in parts, plus three days of labor and lost production,” with realised energy reduction of 11% against a 40% projection. It is one site’s account, not a benchmark, but it shows how a specification gap compounds: the energy model and the maintenance budget both miss.
Downtime Reduction and ROI Modeling
The return on LED grow light reliability testing is measured in avoided mid-cycle replacements. A 7% mid-cycle failure rate on 800 fixtures is 56 service events, each carrying parts, labour, and a production interruption. Screening at the factory does not eliminate those events, but it moves the ones caused by infant mortality to a point where the cost is a rework rather than a lost week.
Brand Insertion Guidance
SLTMAKS runs its aging stations with data-logged duration, per-unit hottest-LED tracking, and batch traceability, so each unit’s burn-in record is tied to its serial number and its batch report. That is the mechanism behind the symptom table above: a failure found in the bay is traceable to a batch, and a batch is traceable to a corrective action. Buyers evaluating any supplier should ask for the same three things, because a burn-in that is not logged is a burn-in that cannot be audited.
Documentation, Compliance, and Traceability
Every claim on a grow light datasheet should map to a specific document you can request and verify. That mapping is the practical output of LED grow light reliability testing: the aging data proves what the fixture did on the line, and the certificates prove it was built and tested to a recognised standard.
UL 8800, LM-79, LM-80/TM-21, LM-84/TM-28
UL 8800 covers the luminaire’s construction and electrical safety in a horticultural environment. Verify it by checking the model number, voltage, mounting and place of manufacture on the NRTL directory record against both the quotation and the physical label on the fixture (SLTMAKS factory audit guide, 2026).
LM-79 is the photometric test that produces the output and efficacy figures. LM-80 measures lumen maintenance at the LED-package level over a minimum of 6,000 hours, with typical runs of 6,000 to 10,000 hours; TM-21 then projects that data forward, capped at up to six times the LM-80 duration. That cap is why a 60,000-hour claim is the ceiling LM-80 and TM-21 can support, and anything above it cannot be substantiated (Philips/Signify, 2023). LM-84 and TM-28 extend the same logic to luminous flux and colour maintenance at the luminaire level.
IEC/EN 62471, CE/RoHS, DLC Alignment
Photobiological safety is assessed against IEC/EN 62471. Ask for the report’s stated Risk Group and compare it with the actual operating distance on your bench, because a fixture can pass at one distance and warrant eye protection at another (SLTMAKS, 2026). CE and RoHS declarations cover conformity and restricted substances; neither is a performance claim.
DLC qualification is verified by confirming the exact fixture identifier appears on the DLC Horticultural Qualified Products List and has not been delisted. The program’s power-quality floor comes from the DLC Technical Requirements for LED-Based Horticultural Lighting V4.0, published 2025-09-01 and effective 2025-10-01.
Batch Reports and Serial-Level Records
Ask for the aging report tied to your production batch, not a generic sample report. A serial-level record should let you trace one fixture back to its driver lot, LED bin, burn-in station, and test timestamp.
⚠️ Warning: A manufacturer’s own aging report is first-party evidence. Pair it with the third-party listing checks (NRTL directory, DLC QPL) before treating it as proof of compliance.
Conclusion
The clearest takeaway from walking the line is that an LED grow light quality control program is only as strong as its aging step. Incoming inspection catches what arrives wrong, and optical validation catches what leaves wrong, but the burn-in window is where marginal drivers, cold solder joints, and binning mismatches declare themselves before a fixture reaches a grow room.
That makes the vendor conversation concrete. Ask four things: how long the aging test runs and under what load and temperature, what the pass/fail criteria are and who signs off, how sampling is determined per batch, and what documentation follows the shipment. A supplier who answers all four with numbers and records is telling you something a spec sheet cannot.
For multi-site operations, the next step is standardisation. Take the five-field gate, the logging list, the symptom table, and the document list from this walkthrough, and write them into one procurement specification so every facility holds suppliers to the same evidence.
Next step: Request the aging and batch test report for the fixtures you are evaluating, or talk to an application engineer about how the protocol maps to your installation.
FAQ
How long should an LED grow light aging test run?
How long should an LED grow light aging test run?
Commercial lighting burn-in typically runs 8 to 24 hours, and 24 hours is the most common choice. The right duration depends on what you need to screen: 2 hours catches gross assembly errors, 8 hours surfaces most connector and solder faults, and 24 hours is where marginal driver components and weak wire bonds usually show themselves. Longer runs cost rack time and energy, so the defensible answer is the shortest duration that still screens the failure modes you care about.
Does passing an aging test prove the fixture will hit its rated output years later?
Does passing an aging test prove the fixture will hit its rated output years later?
No. Burn-in flushes out infant-mortality failures — driver electronics, solder and interconnect joints, and LED module defects that surface under heat, load, and time. It confirms the unit survived the window it was screened in, nothing more. It cannot prove long-term parametric drift, so any report claiming ten-year lumen maintenance off a 72-hour test is overreaching. Ask for LM-80 and TM-21 data instead for maintenance projections.
What records should I request to verify a grow light’s quality control?
What records should I request to verify a grow light’s quality control?
Ask four things: how long the aging test runs and under what load and temperature, what the pass/fail criteria are and who signs off, how sampling is determined per batch, and what documentation follows the shipment. A serial-level record should trace one fixture back to its driver lot, LED bin, burn-in station, and test timestamp. Pair that first-party data with third-party checks like the NRTL directory and the DLC Qualified Products List before treating it as proof of compliance.